My name is Jane and crafting ought to be my middle name. Happily (for me) I’ve passed on my craft-mad genes to my two kids, Charlie (6) and Ella (4). We do heaps of crafting together. It’s our happy place – an easy and relaxing, calm and sociable means of entertaining my kids.
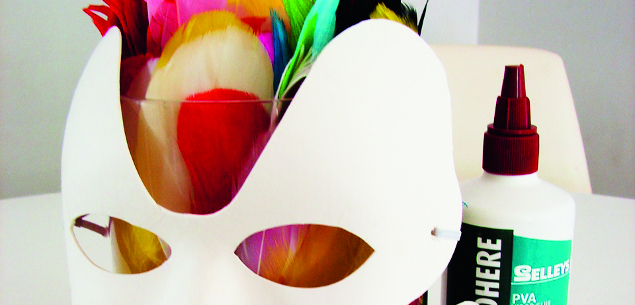
Carnival in rio masks
Charlie, Ella and I really enjoyed the movie Rio and wanted to make masks like the ones the characters wore in the carnival. They had such fabulous colour! We used feathers, but anything else that will stick to the mask with glue or tape should work.
What you will need:
Feathers
Sticky tape
Hair band
Face masks
Paint, paintbrushes
Glitter
Craft glue
Where you can find them:
Masks and feathers at $2 shops
Glue, paint and paintbrushes at Spotlight or hardware shops
*Putting it together
*1. We started with masks and feathers and added paint and glitter later. We bought about $8 worth of feathers and we have heaps left for another craft project. We are now wondering about making a feather rainbow! We’ll keep you posted.
- Charlie and Ella picked the feathers they wanted to use and placed them on a strip of sticky tape stickyside up. This was a bit tricky, so I helped a little at this stage. We folded the sticky tape over the feathers and then stuck the hair band to the top of the mask and the feathers stayed in place. On Ella’s mask you can see the tips of the feathers as well. These are her “rainbow eyelashes”. Charlie opted to use two masks for what he called a “double-bumblebee effect”.
- We added colour to our masks using some paint we had at home. Let it dry for an hour or so and vMila, your carnival masks are ready for the celebration! Just add music and dance!

**Magic wands
**These ribbon wands were something we thought would make a fun birthday present for our niece Sophie, so we made one in each colour of the rainbow. They were very well received by our cat, too!
What you need
Wooden rod
Sandpaper
Pliers
Curtain eye-hook
Fishing swivel
Ribbon
Scissors
Where you can find them:
Hardware stores – wood
Spotlight – curtain eye-hook
Fishing shop
$2 shop
*Putting it together
*1. We got the wooden rod from our local hardware store – the diameter was 10mm and it was 2.4 metres long – they cut it into eight pieces evenly in only a few minutes! Charlie loved seeing the hardware staff use the drop saw, and all we had to do was sand the ends lightly when we got home.
- Using a pair of pliers, I got the curtain hook started on the end of the rod and Charlie twisted it on by hand. Once we had the curtain hook firmly on the end of the rod we needed to slide the fishing swivel on and squeeze the circle shut to make sure the swivel didn’t come off.
- Now for the ribbon! Cut this at an angle with scissors and it won’t fray as easily. Tie a knot around the end of the swivel and vMila! You have a twirl-licious wand!