You will need
• Measuring tape
• Pencil
• 30mm x 30mm timber for slats (we used dressed pine)
• 40mm x 19mm timber for the uprights
• 250mm x 19mm timber for the shelves
• Dropsaw or skillsaw
• Stain (we used Resene Colorwood Whitewash in Resene Bask)
• Wood filler, if desired
• Screws
• Drill bit
• Drill
• Soft paint brush and small paint roller
• Sandpaper/sander
• Paint, for shelves (we used Resene Quick Coat Primer and Resene SpaceCote Low Sheen tinted to Resene Alabaster)
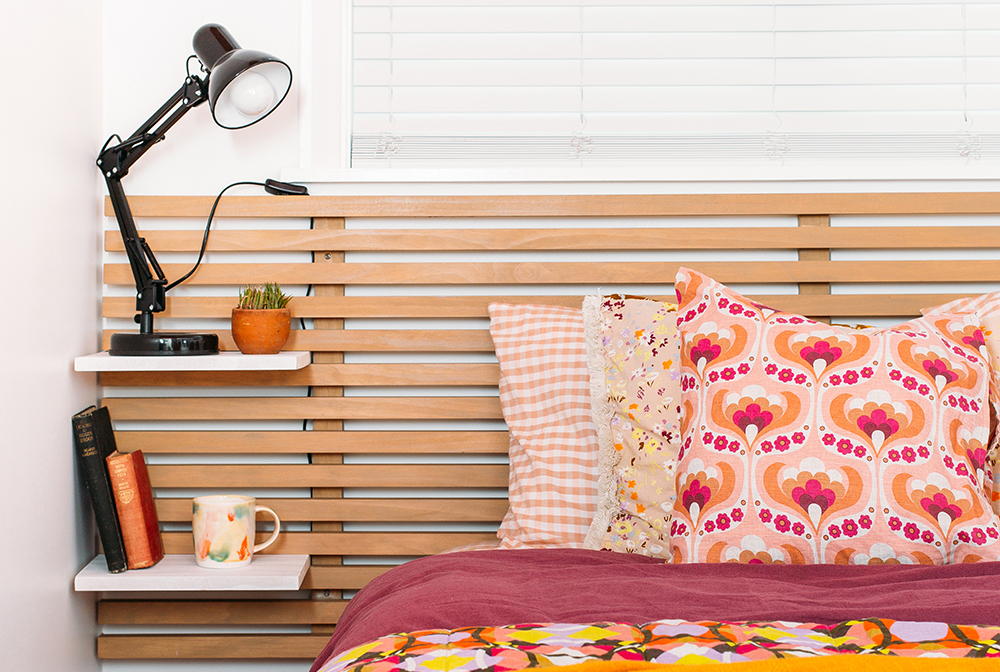
STEP 1
Measure the bedhead space to work out what size timber you will need. While planning, find some studs for fixing as this is where your upright timber will go. We placed ours under a window as there was a stud either side. We also added a third upright in the middle for support, but this doesn’t need to be on a stud.

STEP 2
Measure and cut slats to length. Measure the length of shelf you want and cut to length. It will be best if these can slide all the way to the wall and short enough to miss the upright support timbers. Leave the uprights long until you know exactly where the slats will end. The uprights can be cut off once all the slats and gaps are placed and fixed in.

STEP 3
Give all the timber a light sand.

STEP 4
Lay out the slats on a clean surface with the good face or finished face down. Pre-drill and screw your top slat or horizontal piece flush with the top of all three uprights.

STEP 5
Put the shelf hard under it and place the next piece tightly under that. This needs to be firm so the shelves don’t slip around when inserted (but not so tight you can’t get them out). Pre-drill and screw
the second slat.

STEP 6
Repeat the steps above until you have used all your slats. Cut off the excess upright.

STEP 7
Stain the slats and uprights. We used Resene Colorwood Whitewash in Resene Bask and recommend applying with a soft brush.

STEP 8
Prime and paint the shelves. We used Resene Quick Dry Primer with Resene SpaceCote Low Sheen tinted to Resene Alabaster as a top coat.

STEP 9
Fix the headboard to the wall using at least four large screws. Fill holes with wood filler.

STEP 10
Place the shelves and style as desired.

Paint tip
The higher the paint’s sheen, the easier it is to clean. For a child or teenager’s headboard, you could use Resene Lustacryl semi-gloss or Resene Enamacryl gloss waterborne enamels.

More colours to try (left to right): Resene Colorwood Wash Becalm, Resene Colorwood Wash Rising Tide, Resene Colorwood Wash Shore Thing.